Rethinking UI building in Appsmith, part II
Death by a thousand papercuts
After building countless app UIs ourselves and observing our users do the same in Appsmith, we were struck by the inefficiency of the process. Nearly every user action triggered a chain of tweaks to fulfill the initially clear intent.
While few of these actions were individually annoying, their cumulative effect significantly contributed to wasted resources and unnecessary stress for both builders and users.
Duplo, not Lego Technic
When it comes to assembling interfaces from blocks, there are two extremes: only using low-level primitives like buttons and inputs (Appsmith) or large blocks (Softr) with most products balancing in between.
Assembling everything from basic widgets increases both UI variability and building/maintenance costs, while only having large blocks grants you an initial speed boost but strikes back soon because of a lack of flexibility.
Just like with Lego: you may spend days building something complex and powerful out of countless unique details of expensive Technic, or use Duplo and make kids happy in no time.
With Anvil, we leaned towards the Duplo approach and focused on simplifying established UI building patterns rather than starting a widget factory. This eliminated unnecessary UI tinkering and improved experience for both app viewers and builders.
Modal widget
Let’s take a Modal widget as a first example. Initially, it was just a special container with a few widgets inside: a title and a [close] button on top, two action buttons at the bottom. The rest is yours, and “the possibilities are endless”.
Because of this flexibility, one had to make sure that for every single modal window, the title’s font is the same, buttons are aligned and properly placed. If you needed to make the window wider or narrower, it might be faster to start anew.
No wonder even some of our own internal apps had differently looking modal windows within a single page: the maintenance costs were too high compared to the impact.
And here’s a new Modal widget from Anvil. There’s not much of a difference at first, but the changes are rather radical.
Header and footer are sticky and don’t leave room for wreaking chaos. Sizes are semantic rather than random, and the whole thing is based on Anvil’s layout system, making it bulletproof.
The hard-coded header and button blocks may be swapped with presets at any time and cover the vast majority of real-world use cases.
Stats widget
Similarly to a Modal, the Stats widget was a preset — a container with three pre-configured text widgets and an icon button inside. Even without adding new widgets and only restyling and moving existing ones around, it’s possible to create a huge number of variants, and that is… quite useless.
If we take a look at real-world stats, the variability is rather low, and unless we are really into dashboards, a few established patterns do cover most of the cases.
Anvil’s Stats widget is rather straightforward: an icon and four textual fields. Turning these on and off creates a sufficient number of combinations to cover the most common scenarios.
And, if needed, the system can later be expanded with presets to increase flexibility without sacrificing ease of use.
Any color you like
Say, we want to add a [Delete Record] button and paint it red as it’s a standard color for “danger.” We open the button’s styling options and pick #EF4444 red from the palette. A week later, we update the app by adding another button and make it red #B91C1C. No, custom red. Like, say, #FF3C47 or #FF3609…
Over time, small errors like these only accumulate and either increase the maintenance costs or make the apps look unprofessional.


In the worst-case scenario, the app builder could add a bit of creative styling, and such creativity can be rather brutal to the app viewers who will suffer from unnecessary eye strain and a loss of efficiency.

Given that internal apps are rather utilitarian, we decided to address this problem by moving away from existing styling options to semantic ones while owning full control over the visuals.
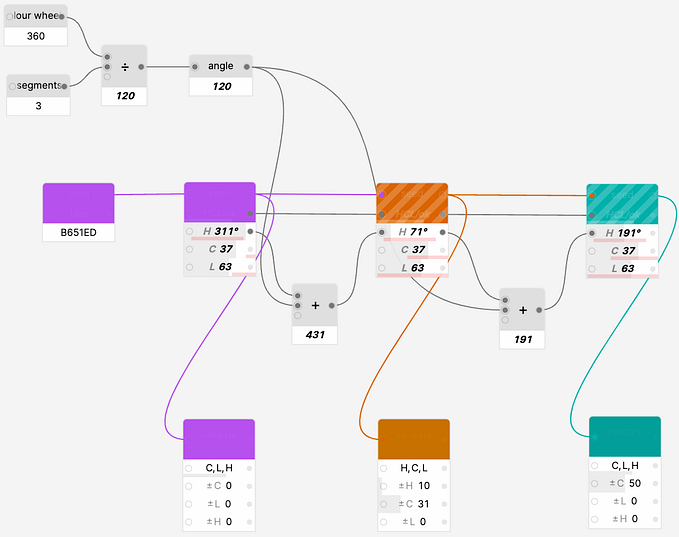
Say, what if instead of doing all the styling work by themselves, app builders could get free help from a junior designer? Professional designers exist for a reason, but a significant part of the theming work can be described algorithmically. A single “seed” is often enough to generate the full range of colors and styling options.
We can take the initial color, analyze its luminance, chroma and hue and then generate a full set of colors for the “semaphore” (positive/warning/negative) actions, borders, materials and so on.
This can be achieved with a bit of knowledge of color theory and math. As we have total control over the color tokens, we can make sure all foreground/background combinations pass accessibility requirements, the system doesn’t break on pale or monochromatic colors, and so on. And features like dark mode become just a branch in the algorithm. A more detailed description of the algorithms requires a separate article, so we’ll skip it for now.
The semantic approach has its downsides in terms of flexibility, but UI building speed and maintenance costs make it a clear winner, with page rendering speed being a cherry on top.
Accessible by default
Accessibility is one of the aspects of app building that is commonly overlooked. It’s rarely a hard requirement, app builders don’t have sufficient knowledge of the topic, and putting effort into something you don’t fully understand is extra hard if the deadline was last week.
Yet accessible apps benefit both operators with disabilities and regular ones, using computers during long shifts. Improved contrast and dark mode reduce eye strain, keyboard navigation speeds up routine operations, and responsive UI makes apps usable across a wide range of screens and devices.
What if instead of relying on app builders to make their apps accessible, Anvil could do most of the work? All the prerequisites like semantic styles, color generation algorithms, or new layout engine were already there, and we only needed to get them together and tweak a few things. As a result, in Anvil it’s nearly impossible to create an app that’s not accessible to a wide range of app viewers with various needs — and best of all, it requires zero effort from the app builder.
The automatic layout engine cannot beat a hand-made app, but ensures the UI is always usable.
Keyboard navigation just works
and the theming engine makes sure no color combination breaks the system.
Click to…
One of the features of Anvil’s layout system is its natural ability to pack widgets as tightly as possible. This was a highly anticipated and desired change for both app builders and app users, except for some minor side effects.
Anvil’s “matryoshka” hierarchy of canvas → zones → sections → widgets means a widget always exists inside two nested containers and, naturally, there might be a need to access the containers rather than widgets themselves.
If these containers have visuals, there’ll be some natural padding between them and a widget, but what if the visual separation is missing?

Another troublemaker is Appsmith widgets’ interactivity in the UI building mode, a common pattern among the low-code tools. This allowed tool makers to focus less on debugging by making the app interactive during the assembly, and the app builders saved time by not switching back and forth between the edit and the preview modes. That’s good, right?
Not that much if we recall that clicks, toggling widget interactions, are also used for selecting and moving widgets or layout elements. And by combining both, we end up with a system where an app builder regularly triggers actions while trying to select a button or adjust its position. For safe actions like displaying a notification or opening a modal, it’s merely an annoyance, but selecting a button labelled [Delete] or [Stop] may get scary. Now imagine that very often there’s literally no room for a safe click, and things will look way more interesting…
Disabling widgets’ click-based actions in edit mode is a natural step forward. It does slow down initial debugging but rewards us in the long run because of improved UI building speed and increased safety. And, as a free bonus, we could add some useful interactions like on-canvas renaming by double-clicking a text component.

Now back to selecting widgets and layout components.
There are a few really good, established patterns there.
Figma and Framer heavily rely on the Layer panel for navigation and not the canvas itself. This helps reduce visual clutter in on-canvas UI but makes UI building dependent on the Layer panel. That’s a luxury we couldn’t afford for a number of reasons: quick access to the widget’s name is a fundamental requirement, and existing implementation of the Entity Explorer (Appsmith’s analogue of Layers) made any changes disproportionally expensive.
Another great pattern can be found in tools like Webflow and Plasmic. Each widget or layout element has an interactive name component that helps you navigate to any entity’s parent in a couple of clicks. It works really well for ZUI-driven canvas tools and complex layouts but might be overkill for our relatively simple hierarchy.
Not all canvas entities are made equal, and most of the time app builders move widgets, which are just a click away. Zones come second, and sections are the least frequently selected element for a reason: one rarely needs to reorder really large layout blocks.
A Webflow/Plasmic pattern means being able to select a widget in a single click, while two more are needed for both zones and sections. Given that selection is one of the most frequent UI building actions, we kept experimenting.
The most interesting solution to this problem is offered by Jet Admin, a no-code tool that doesn’t have an Entity Explorer and only relies on canvas for UI building. Selecting a parental element is done by pressing the ⬆️ button that resides inside a name component. One less click, bingo!
Early prototype testing demonstrated clear benefits of this pattern for our layout engine, and after a bit of tweaking, it was adopted in Anvil.
There are obvious glitches like activated hover state for children when the parent is selected, but it does the job really well.
Interface performance
One of the side effects of Anvil was significantly improved UI performance for app viewers who no longer had to wait for the interface to redraw as more actions could be packed into a single screen.
“Just works”
Many aspects of interacting with the product are usually perceived as defaults rather than being designed. We rarely pay attention to the details when they are in place, even though they do sum up and shape the overall perception.
That’s a never-ending flow of QoL and maintenance tasks which are rarely prioritized, but once they are done, you’ll never look back.
Morphing widgets
When building an interface, it’s not always clear which exact control is the best for the job. Say, we need to let app viewers add some data. It may likely be an input. But which one? Single-line text, multi-line text, number, or something else?
Previously, you had to think twice before starting to configure a widget, as choosing the wrong type could have led to restarting the process. Not so much in Anvil, where many widgets are mutable so that we can start with the skeleton of the UI and then tweak it on the go, focusing on function rather than form.
Turning off the disco
When using a fixed canvas, you are constantly getting bombarded by visual noise. Bounding boxes, dots, shadows, and widgets flicker like a disco strobe. These micro-interactions are not useful and contribute to the builders’ fatigue without giving anything in return.
While building Anvil, we tried to make the on-canvas UI as clear and unobtrusive as possible while being accessible and providing full clarity to the app builder. For example, moving objects across the screen doesn’t cause any layout shifts, and even on drop, it changes once rather than flickering a few times.
Tidy up
Zones, sections, and certain widgets can be represented as cards, a common pattern in modern app design. But what if these cards are nested or two zones in the same section have different background styles? In the worst case, we could get vertical alignment problems or have redundant paddings if all backgrounds are turned off. In most UI builders, making things nice and tidy requires tinkering with padding options, a rather thankless job for a non-design-savvy user.
Anvil takes care of all this combinatorics automatically, so that one wouldn’t even know the problem exists.
Defaults
What happens when you drag a widget from the widget panel and drop it on the canvas?
You drop it, configure, add another instance, repeat. Not the primary time-waster, but there’s room for improvement. For every Anvil widget, we designed reasonable defaults, nudging app builders towards the right usage of the widget while saving them a couple of clicks.
For example, the Paragraph widget has a lengthy quote as default text, discouraging app builders from using it as a substitute for labels, and the Header is clearly labeled as such.


Stylistic preferences are retained when necessary so that, say, the next button would have the same semantic style as its neighbor.
This mechanic can be safely expanded later with more sophisticated heuristics which could, for instance, disallow adding two consecutive accent buttons to the same group.
Another direction for improvements is implementing an explicit duplicate mechanic that retains key properties of objects rather than blindly copying everything from the original. And, obviously, a new naming schema, as “Text4CopyCopyCopy” is the least elegant way to name a new text widget in 2024.

As a small touch, we synchronized the visuals of the thumbnails with actual defaults of some widgets so when you add an Icon Button, Inline or Toolbar Buttons, the widget looks similar to what you had on the preview.
Copy-Paste
Copy-paste is so fundamental that it’s often forgotten or seen as working by default.
Completing the action requires specifying a copied object (usually done by selecting an object and pressing a Cmd+C/Ctrl+C keyboard shortcut or a dedicated interface button) and a target. The latter can be a selected object or a pointer position. Sounds simple so far.
Now let’s recall our object hierarchy: canvas → zones → sections → widgets. Pasting a widget to an empty canvas is trivial, but what about other combinations? We can try pasting a zone to a widget, section to a zone, or add a zone to a full section.
All these scenarios can be mapped to a 4×3 matrix to simplify both development and QA.

And while specific mechanics did require tweaking, a high-level principle “if paste cannot be completed with current selection, place the object after the original at the very first available parental slot” does cover the vast majority of cases.
Once implemented, all these interactions feel natural, as if they had always existed rather than being carefully crafted.
Closing thoughts
At the time of writing, Anvil is in a closed alpha stage.
All core mechanics are working, although the number of widgets is relatively small and the end-to-end product integration is incomplete.
Anvil significantly improves UI creation and update speed (~3x in our tests) while also benefiting both app builders and viewers. It also provides room for future extension: from brand specific themes to modifying hundreds of apps parametrically using code or AI.
While many aspects of the project are not new (semantic styling, widget morphing), things like intent-based mechanics may lay down the foundation for new generations of no-code/low-code products.
Ready to build the next big thing?
Let’s connect and have a chat: https://www.linkedin.com/in/tbrizitsky